Demersus Devlog #13 - Asset Pipeline, Clay Doh, Camera Effects, Sequence Layouts and New Milestones
Documenting the new Blender to Unity pipeline, acquiring the Clay Doh shader, new camera effects for better immersion, rough sequence layouts, new milestones and more.
- reading time
- 19 minutes
- published
- authors
- Eryk Darnowski
- series
- Demersus Devlogs
- categories
- Game Development
- tags
- #Ztgk #Unity
Camera Effects
Camera effects is something that is (if done right) not something that you really notice but definitely feel, it’s not that hard to implement but increases immersion and the game’s look & feel dramatically, so I decided to implement these effects:
- mouse smoothing
- motion blur (I also have a cool idea regarding this with audio flashbacks)
- head bob
I implemented mouse smoothing using Mathf.Clamp and motion blur via the Volume
component on the default Sky and Fog Volume object. I played around with different parameters
and dialed them in:
Although, something that I noticed is the fact that they feel quite a bit different when playing in the editor compared to a build - I still have to figure out the exact reason behind that.
Then I moved on to implementing the head bob script, I got inspiration from this video which resulted in an interesting outcome at first:
Then I got the values tuned properly and this is what I ended up with (added temporary material to floor so you’re able to see the sway better):
Improved Gaze Detection
After exploring the channel of an awesome creator I mentioned in one of the latest devlogs I saw a video that peaked my interest. It was basically about using the camera’s frustum to detect if an object is in view or not instead of dot products! I wanted to experiment with that a little bit so I did!
There exists a little pain point with the current gaze detection system, it basically consists of the fact that it uses a cone, which has a circle bottom, making the detection zone quite different from top to bottom and side to side.
I concluded that the system mentioned above would work great for this task, so I tried implementing it and it turned out great, I obviously modified it quite a bit, added a detection FOV zone settings so you can independently set the height and width, debug displays and more!
Rough Layouts For Sequences
This section is about my bud’s work, his thoughts and what he learned paraphrased slightly by me:
So after creating the rough bounds of each room using Unity’s ProBuilder I initially started out ‘furnishing’ them (temporarily) using different assets form SketchFab. This however proved quite challenging for a variety of different reasons, here are a few of them:
- issues with inconsistent scaling
- parts of the models not always being separated making creating the scenes more difficult
- a big mess caused by the textures and other additional files (which are unnecessary at this point)
After a bit of tinkering I decided to start creating rough outlines of the furniture using ProBuilder which proved to be a lot quicker, more intuitive and cleaner in the end.
Here is a little moody walk-through I did of the rooms:
Cutscene Research
Something that I’ve been really curious about is how real-time cutscenes are done in Unity, so I did some research and turns out that Timeline makes it quite intuitive (it actually reminds me a lot of Adobe Premiere) but at the same time is very powerful and full of customization!
I also looked in to how I should go about using Mocap Fusion (for VR FBT motion capture) could together with the Timeline system.
Something really cool about VR motion capture compared to things like OptiTrack is that it allows you to immerse yourself more as the actor, this is enabled by Mocap Fusion and it’s Unity SDK. This should (in theory) allow you to easily create and import different environments, assets and characters (rigs) to use in the software.
I initially though that I’ll have to setup the character rigs specifically for Motion Capture, do the same with environment (this as just a reference for acting), then record and export everything to Unity, but after doing more research I found out about retargeting, setting up a humanoid in Unity (after mocap import), IK in the Timeline for fixing retargeting proportion discrepancies and better yet about Mocap Fusion x Unity Live-Link which would allow me to streamline the whole pipeline as I wouldn’t have to do as much asset shuffling between software!
However I shouldn’t forget about clean up which could be done in Blender as an additional step between Mocap Fusion and Unity.
Timeline Editor Tutorials
- Cinematic Cutscene in Unity 3D using Timeline & Cinemachine tutorial
- 4 Simple Steps to Create a Custom Timeline Track in Unity
- Unity Video Tutorial: Getting Started with Timeline
Small Adaptive Probe Volumes Experiment
At first when learning about how light baking and Adaptive Probe Volumes work, I had issues getting them to work, I just couldn’t get all of the things in order for some reason. However lately I finally managed to do it, mostly thanks to this awesome video, basically, this is the minimum that needs to be done in order to get it to start baking (at least in HDRP):
Here is how the very first test turned out (looks pretty good if I may say so myself, it’s a big improvement compared to the usual in engine lighting I’m used to) and better yet, if you look closely you’ll notice that the character actually casts a dynamic shadow (I’ll of course look more in to how these things work later down the line but still)!
Here is a YouTube video showing a side-by-side how big of a difference APVs really make:
Clay Doh
What is It?
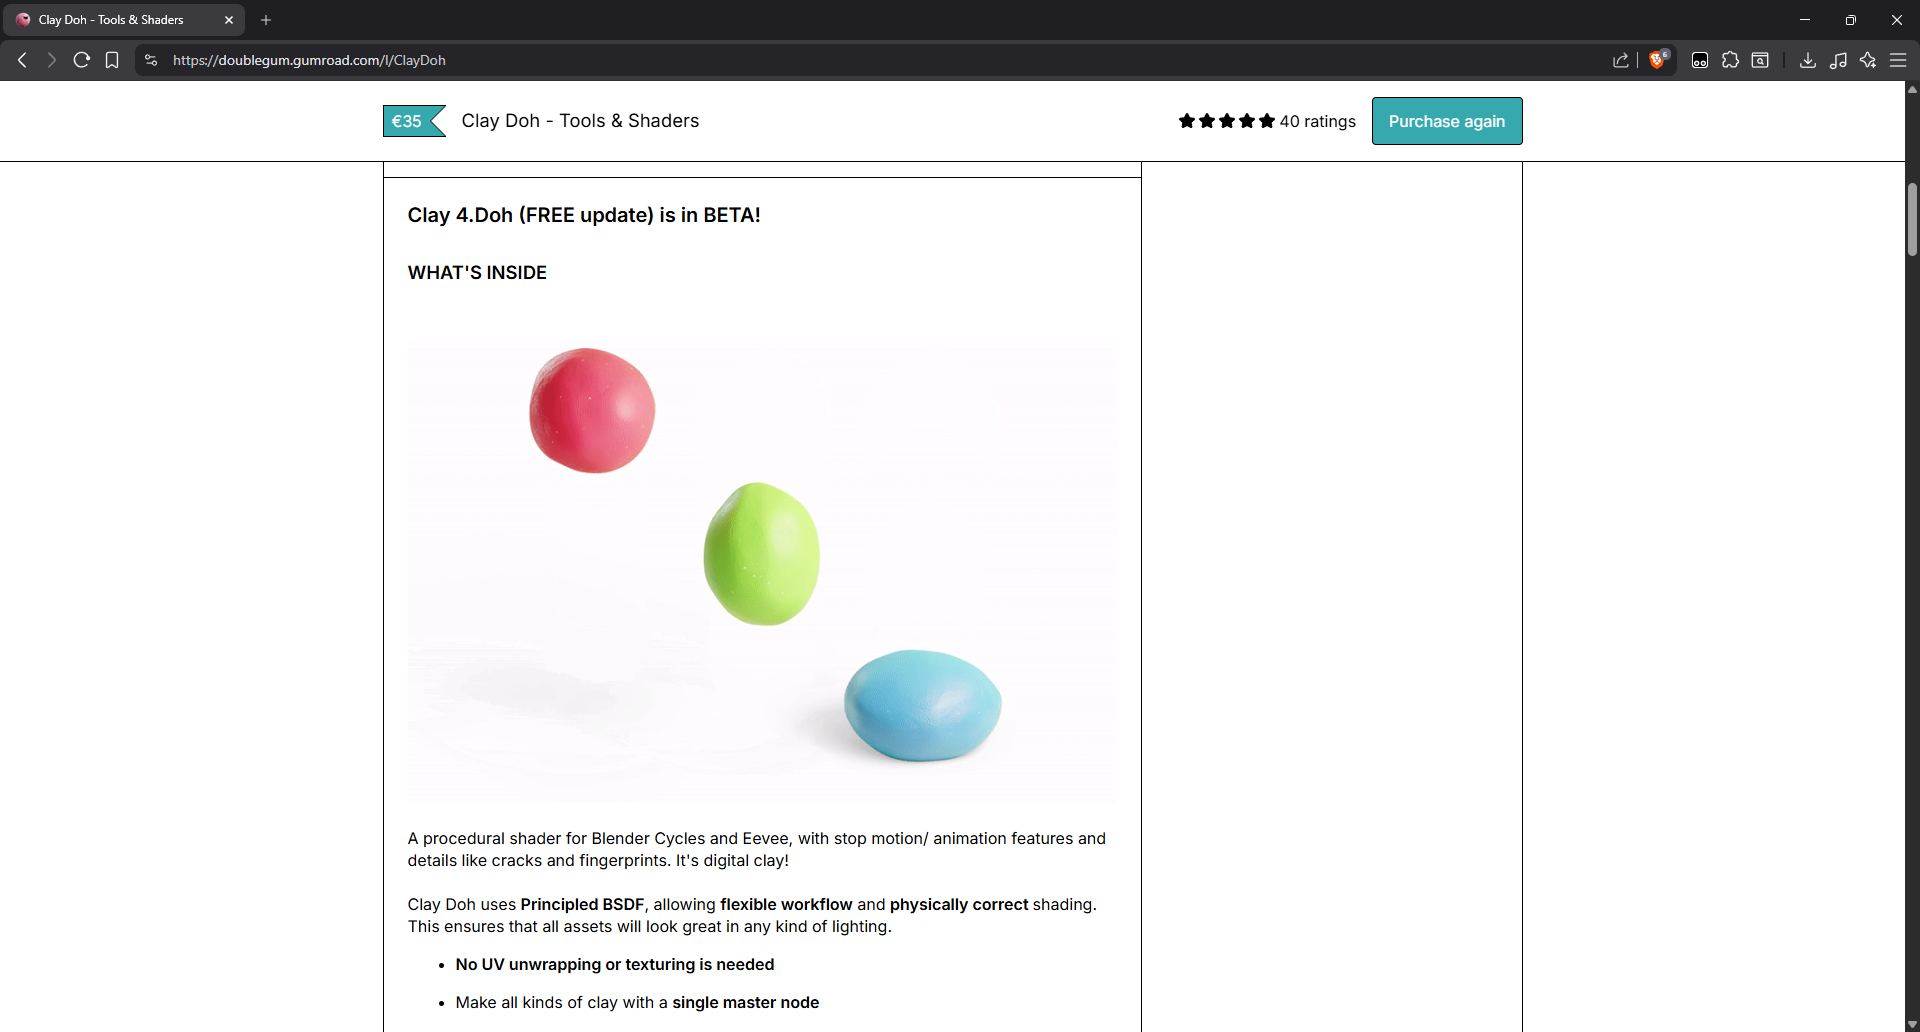
Clay Doh is a procedural shader toolkit for Blender by Rahul Parihar that promises to give your 3D models a handmade clay look, complete with a slew of customizable settings such as fingertips, cracks, impressions, surface details and more. It works through a friendly single master node system so there’s no need for UV unwrapping or texturing when you’re not going outside of Blender. It comes with 13 material presets, a bunch of modifiers and tools such as a clay text generator. It also has stop motion and other features for making the animating process easier.
Why We Got It?
Even when thinking of the 3D scanning approach, through experience I knew that we wouldn’t be able to get any sort of detailed texture of the models, meaning we had to apply some sort of procedural clay material afterwards, to make clay look more like clay.
I already did some research and found a few tutorials on how to go about doing something like that, but while doing that I stumbled on Clay Doh. This looked very promising on the provided renders and felt like a complete set of tools. After making sure it also works for game dev (via the FAQ section) we decided to pull the plug and got it.
First Tests in Blender
Understandably I was excited and right after getting the software I jumped right in to Blender, installed it and started testing things (which at first didn’t go too well).
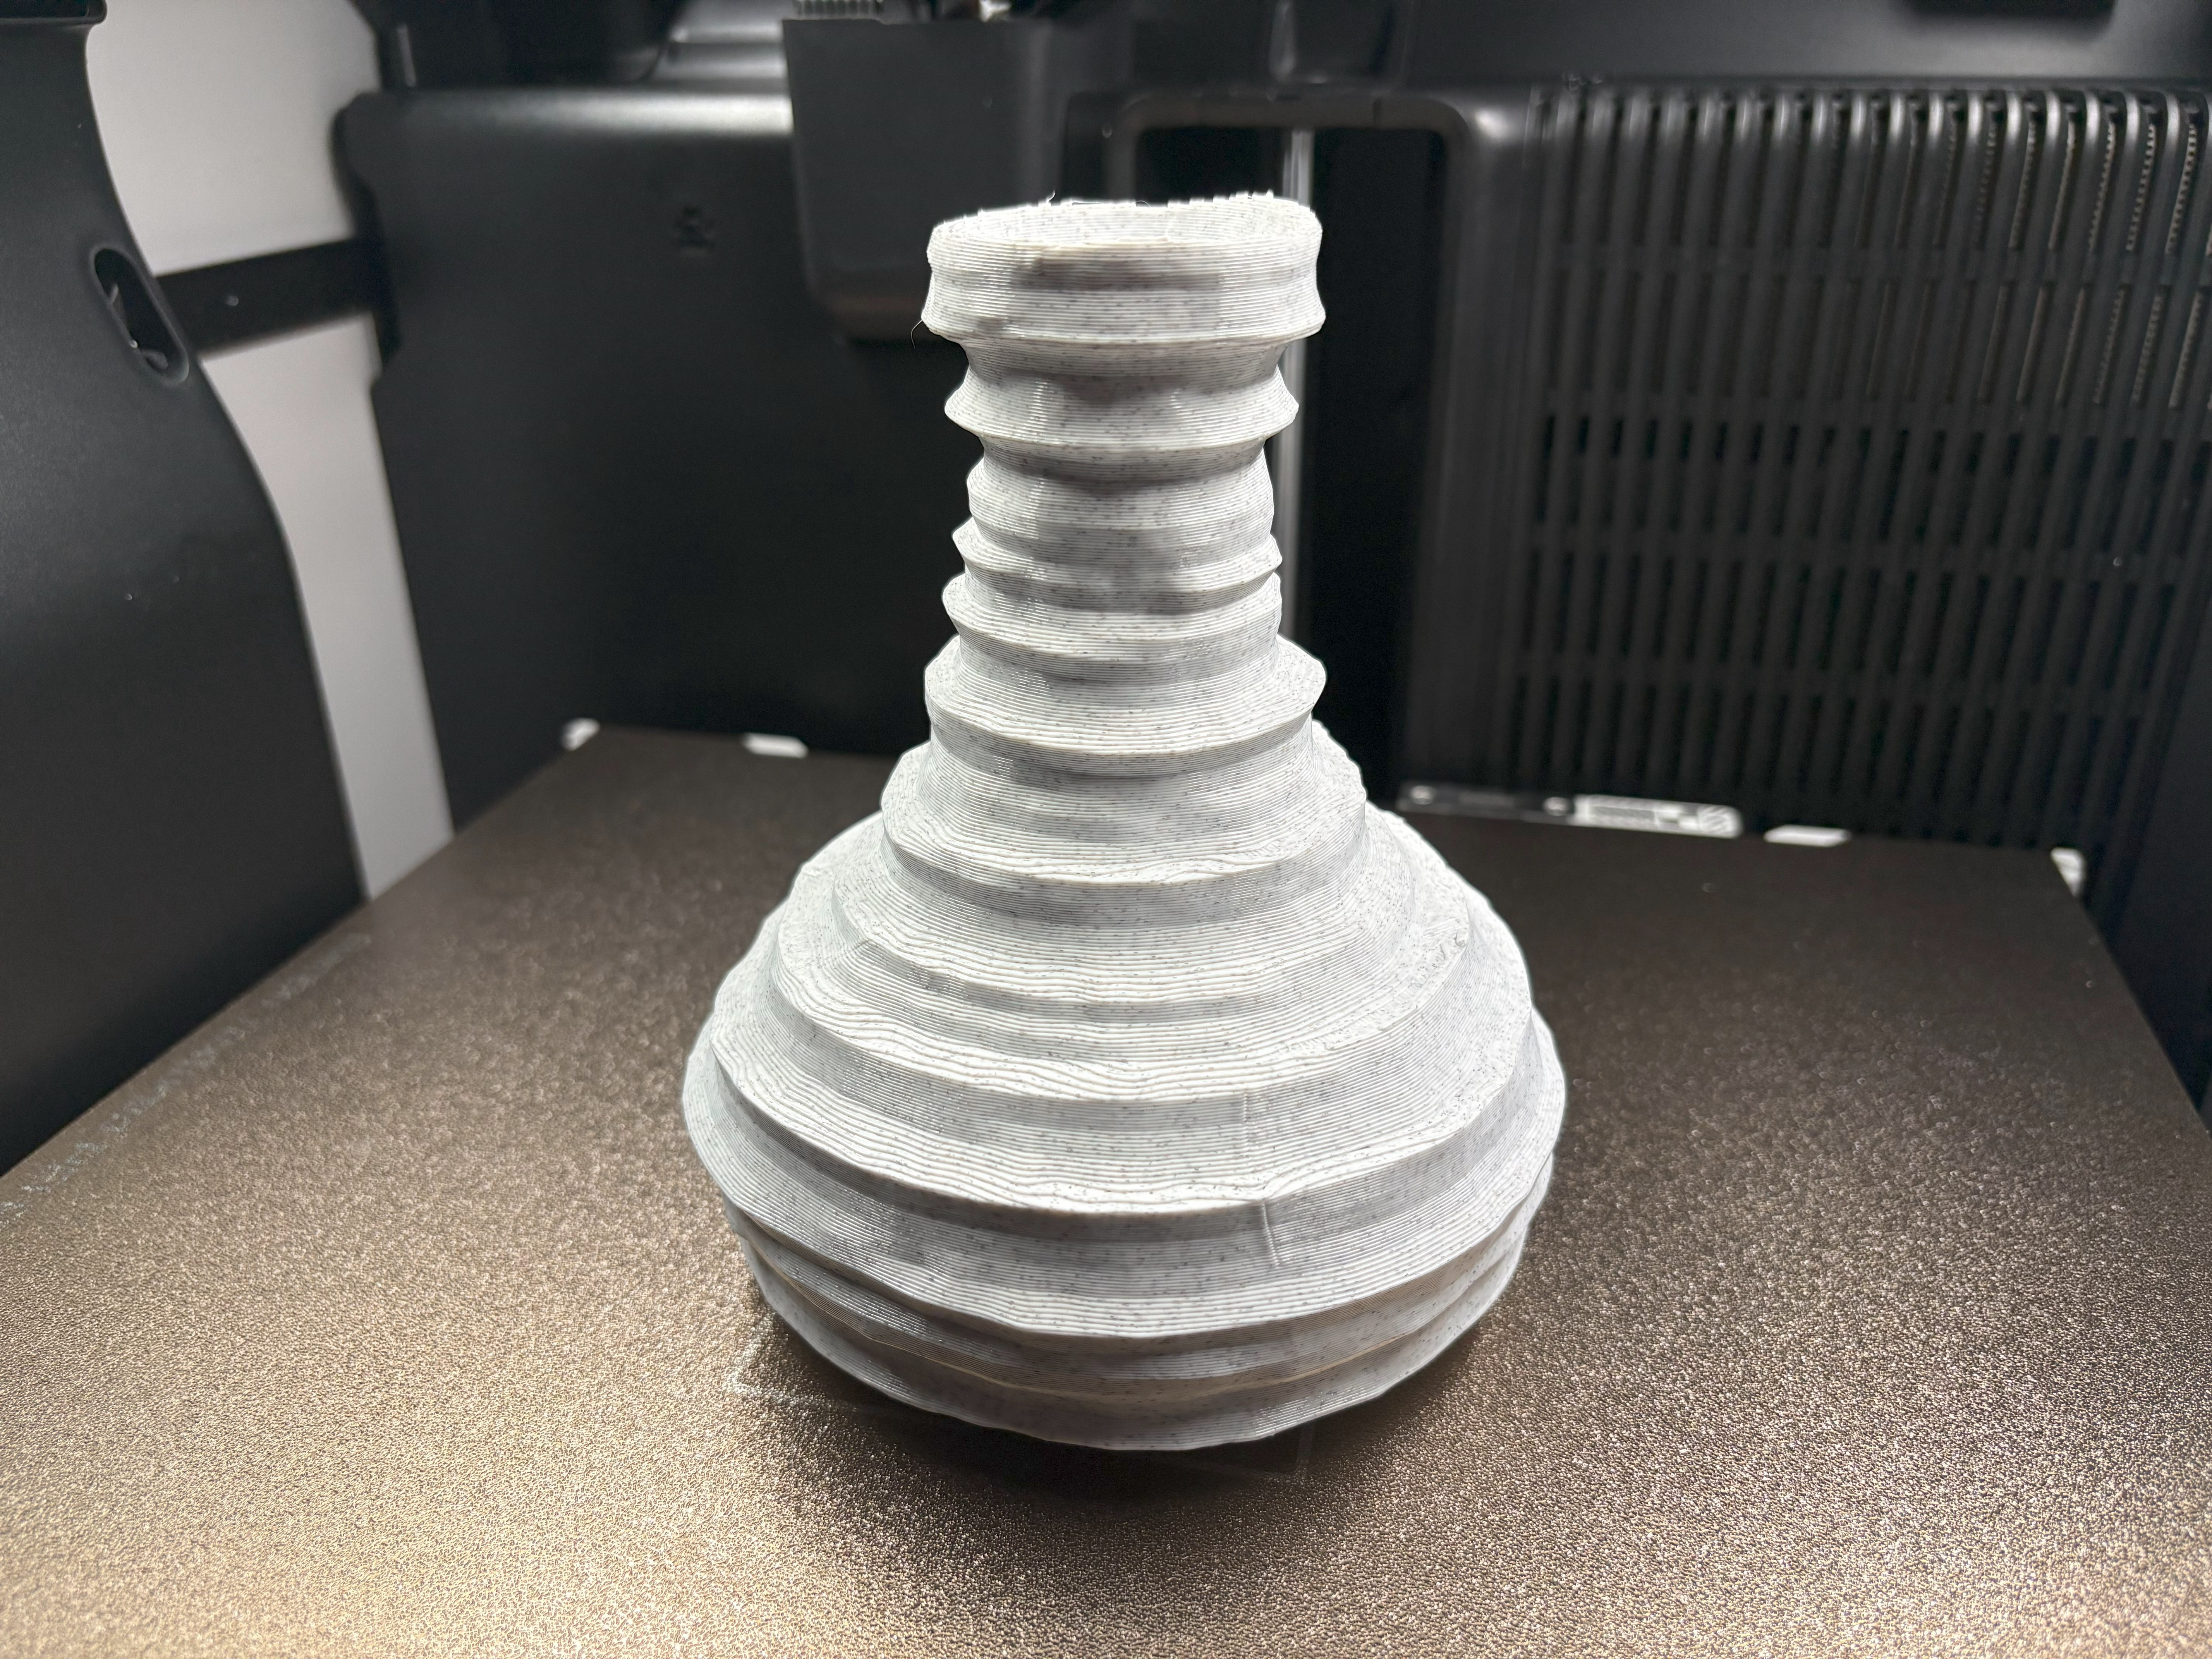
The first thing I did is I got the phone puzzle land-phone model and just applied one of the presets to it, causing it to balloon in size and rip at the seems. After some tweaking I found out that the look of everything can be fixed by tweaking the material setting like so:
- Global Displacement =
0 - Global Texture Scale = (this depends on the look you’re going for but in this case
110worked)
Adding a Clay Doh Organic Deform modifier with a very low Noise Strength (in this
case 0.01) can sell the effect better, however as you’ll see later on, through more
experimentation I came to the conclusion that assets will have to be made in a specific way
so the clay aesthetic can really be brought to life and shine.
So after that, I looked through the entirety of the provided resources (documentation and videos), did a bunch more testing and came up with the described below pipeline for creating, prepping, exporting and importing 3D Clay Doh assets from Blender to Unity.
Approach to the Model to Engine Pipeline
Something I tried after experimenting with Clay Doh was baking and importing everything in to the Unity engine, during that trial & error process I’ve learned a lot about how to bake things and how to properly import and set them up in Unity. Here is a little pipeline I devised for creating, working with and moving over Clay Doh based assets:
1. Creating the Base
This process starts out in Blender, using the Clay Doh add-on as a base. The collection tool built in to the add-on allows for very quick and easy creation of realistic, handmade looking assets by just using a bunch of primitive shapes.
Use materials from Clay Doh Presets as they’re not image based, making them more flexible!
You cannot apply multiple materials to the same Clay Doh collection!
You should keep the main texture scale values consistent across all materials used in a model to keep cohesion and continuation of details like finger prints and such!
- Use the Clay Doh collection tool for most of the modeling (you can utilize the built in boolean functionality of it as well). Remember to mess around with the
ResolutionandSmooth Iterationsvalues for the best results (also try to keep these consistent, especially on the same asset). - Model out the asset in the collection using primitives and modifiers such as
Curve. - In order to make use of multiple materials, use more than one collection or separate meshes with different materials applied.
2. Tweaking Materials
This is done in a separate step because modifiers and transforms need to be applied in so that big changes don’t throw off our look later on.
It’s recommended to look at the materials in the Cycles engine, with at least 50 steps and de-noising ON as that will give the closest results to Unity’s HDRP!
- Duplicate your work from the previous step in to a separate collection as a ‘backup’.
- Apply all modifiers on all meshes.
- For each mesh, perform
Apply All Transformsvia Ctrl + A (this makes it so your UV projections and heightmaps behave predictably in the next steps). - For each mesh, apply the materials you want (if you haven’t already) and set up their parameters for the look you’re after (this should be consistent across assets of similar type). Remember to turn OFF
Random Per Objectso the materials don’t change after duplicating and have a consistent global texture scaling value between them.
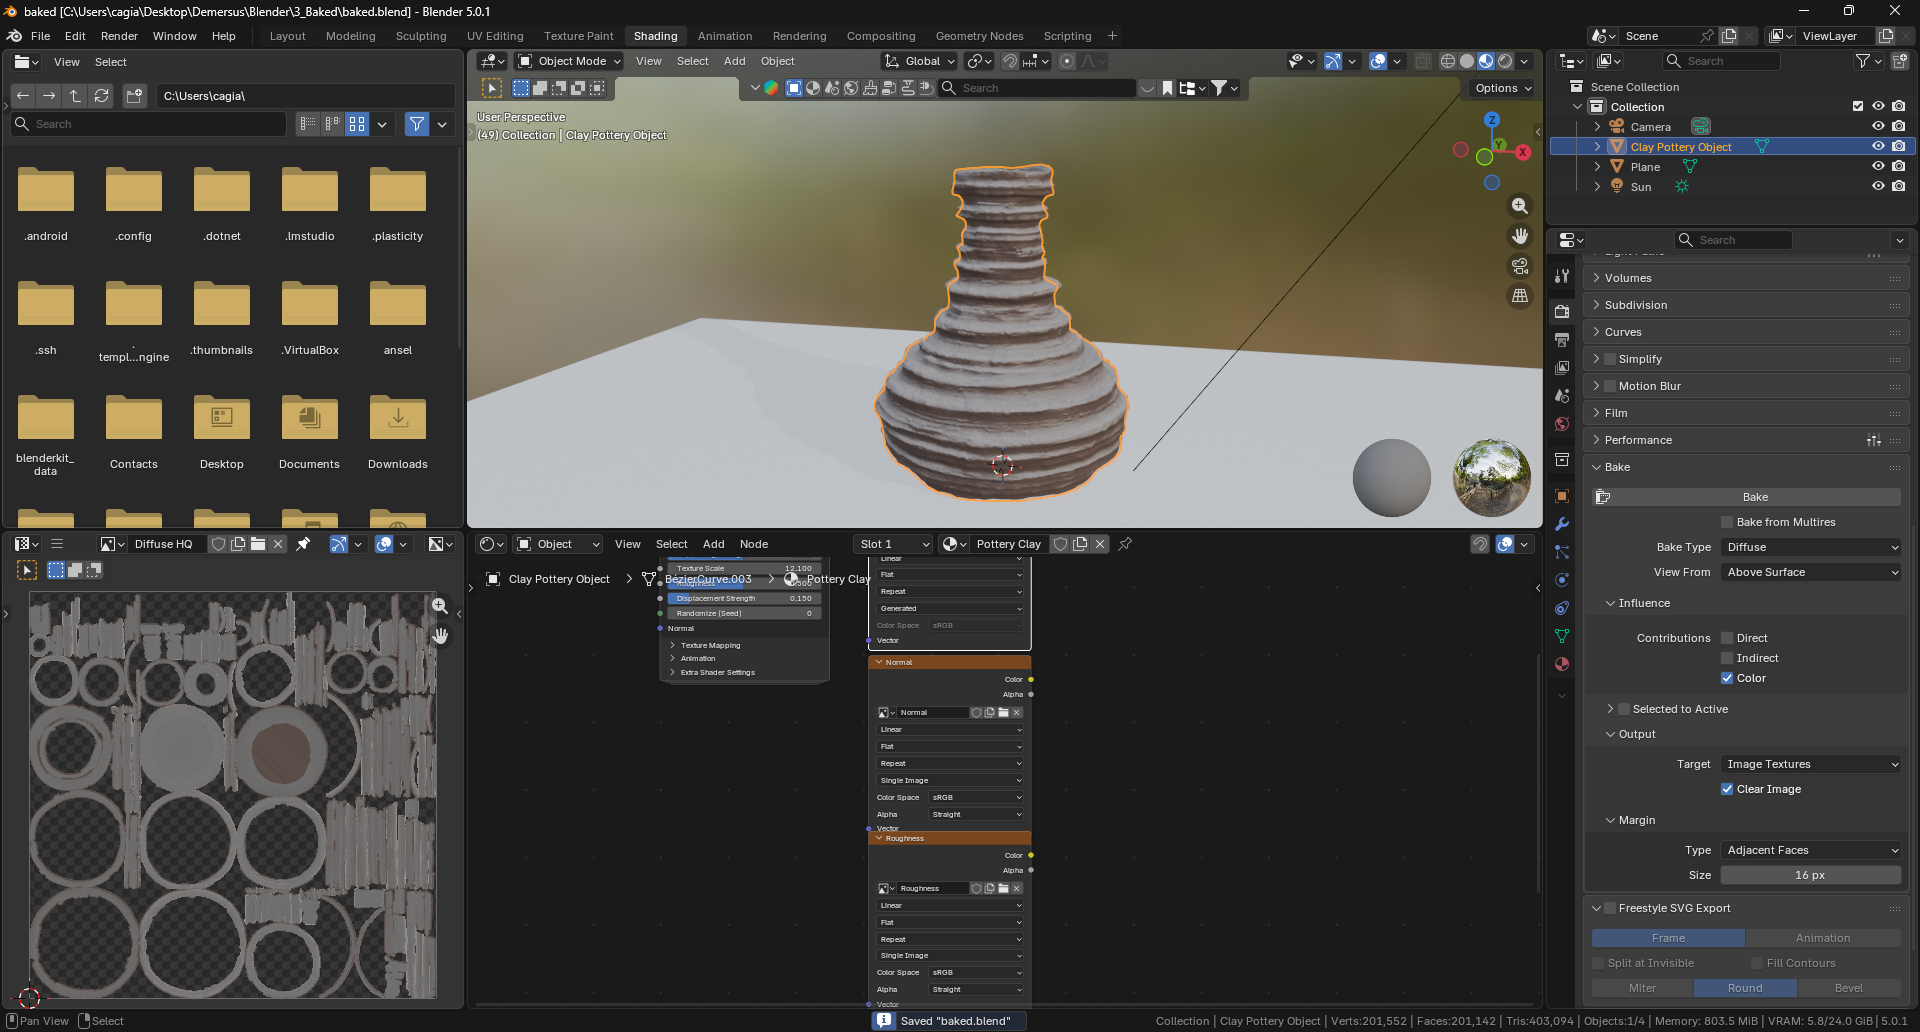
3. Baking Geometry
This step exists because first of all, we have a bunch of modifiers that need to be applied and second of all, the materials provided by Clay Doh apply a shader-based displacement to the surface of the meshes, this doesn’t influence the base geometry, therefore the changes need to be baked in to the geometry so we can proceed further down the pipeline (and for example, don’t get artifacts when performing bool operations).
It’s crucial that you UV project and bake the heightmap of every mesh!
Make sure you don’t have double displacement because of not disconnecting it!
If you’re having trouble baking, check out: Potential Baking Issues!
- Duplicate your work from the previous step in to a separate collection as a ‘backup’.
- UV project all meshes by selecting one, going in to Edit Mode, pressing A, pressing U and clicking
Smart UV Project>Unwrap(for every one of them). - For each mesh, (in the
Shadingtab) create a newImage Texturenode and a new texture (leave the settings alone, and bake on to2048x2048- though this depends on the size, proximity and importance of the asset). - For each mesh, connect
Heightfrom the Clay Doh node to theSurfaceon the output node and disconnectDisplacement. - For each mesh, bake the heightmap via
EmissionBake Type, on theCyclesRender Engine. - Remember to save the baked textures in a safe place with proper naming.
- For each mesh, add a
Displacemodifier, create new texture, open the previously rendered texture in to it, then go back to the modifier settings and set Coordinates toUVand UV Map toUVMap. - Even though I found that a good starting point is matching the
Midlevelvalue to the one in the material’s General Settings and starting out the strength as1/3of the Global Displacement value of it, things can vary quite a lot so you’ll have to tweak the parameters of theDisplacemodifier (mostlyStrength) by eye, so that it matches the way it looked when being displaced by the material itself.
4. Fixing Geometry
This step is needed because baking and applying the displacement to the mesh can cause unwanted artifacts, and we want to clean those up before moving on as they’ll be baked in further down the chain and therefore clearly visible, later in game, detracting from the asset’s looks.
- Duplicate your work from the previous step in to a separate collection as a ‘backup’.
- Apply the
Displacemodifiers. - Inspect the model in search of obvious issues (unnatural looking artifacts) and if found, fix them by moving each vertex around manually, or in certain cases, you can simplify the geometry by removing vertices and creating new faces.
- Perform
Apply All Transformsvia Ctrl + A on all separate parts of the model (this ensures a clean input for the next step after messing with the geometry).
5. Simplifying Topology
This step (as the name would imply) consists of two actions, the first being boolean operations that are there to reduce the number of hidden faces and join all the parts of the mesh together, the second being decimation, both of which meant to reduce the overall geometrical complexity of the model to optimize it for in engine use.
Re-topology should be done instead of decimation as it offers higher quality results and gives more control over the topology, however because of the manpower and time constraints we are unable to do that!
Be careful when performing decimation (it’s a heavy handed approach), try not to degrade the look of the model as much as possible while also keeping the triangle count down!
- Duplicate your work from the previous step in to a separate collection as a ‘backup’.
- To join all meshes of the asset together, use the
Booleanmodifier (collection mode is great for this) set toUnion, Solver toExactand Materials under Solver Options toTransfer. - Apply the
Booleanmodifier and delete the unnecessary remainders of the joined meshes. - Perform
Apply All Transformsvia Ctrl + A (this ensures your high poly mesh is clean and zeroed out before the UV unwrap in the next step - mismatched transforms between the high and low poly meshes are a common source of baking artifacts later on). - UV project the mesh by going in to Edit Mode, pressing A, pressing U and clicking
Smart UV Project>Unwrap. - Duplicate your work in to a separate collection as a ‘backup’. This will be the high poly version you’ll use in the next step.
- Use the
Decimatemodifier (for example I lowered it to the point where the model had about1.8Kfaces - though this depends on the size, proximity and importance of the asset). - Apply the
Decimatemodifier. - Perform
Apply All Transformsvia Ctrl + A (this ensures your low poly mesh is clean and zeroed out before the UV unwrap in the next step - mismatched transforms between the high and low poly meshes are a common source of baking artifacts later on). - UV project the mesh by going in to Edit Mode, pressing A, pressing U and clicking
Smart UV Project>Unwrap.
6. Baking High Poly Details
This step ensures we preserve the high poly model’s details on the low poly one, thanks to baking them in to the normal map. This little trick allows us to have the best of both worlds, high detail but low topology complexity and therefore great performance in engine. This step was inspired by this video.
Make sure you applied all transforms and UV projected both the high and low poly meshes as instructed above!
If you’re having trouble baking, check out: Potential Baking Issues!
- In the hierarchy view, select the high poly model and while holding Ctrl, select the low poly model (both of them were prepared in the previous step).
- In the
Shadingtab, in each material slot, using the previously createdImage Texturenodes create and select a new image (leave the settings alone, and bake on to2048x2048- though this depends on the size, proximity and importance of the asset). - In the Bake settings, make sure you picked
Normalunder Bake Type, setSelected to ActiveON, and start the Extrusion value out at0.02 m. - Make sure you have the
Image Texturenodes clicked and the same images selected inside them for every slot to ensure you bake every material in to the same texture. - Bake the normal map and examine the results. I’ve found that the above mentioned Extrusion value worked well in my case but you should tweak it to your asset - you’ll know you’re having problems when you notice weird artifacts in the texture.
- Remember to save the baked normal map in a safe place with proper naming.
7. Baking the Rest
This step consists of baking and exporting all of the remaining textures that we’ll need in Unity.
Bake these on the low poly mesh!
Make sure you have Selected to Active unchecked after the normal details bake!
Turn OFF Influence of all but Color when baking diffuse texture (we need albedo)!
If you’re having trouble baking, check out: Potential Baking Issues!
- You can now hide the high poly model and just select the low poly one.
- In each material slot, using the previously created
Image Texturenodes create and select a new image for each texture being baked (leave the settings alone, and bake on to2048x2048- though this depends on the size, proximity and importance of the asset). - Make sure you have the
Image Texturenodes clicked and the same images selected inside them for every slot to ensure you bake every material in to the same texture. - Now, bake the
diffuse(albedo),ambient occlusionandroughnesstextures all in the same manner, just with a different Render Type and output image selected. - Remember to save all the baked textures in a safe place with proper naming.
8. Exporting from Blender
This step prepares the final model for export. We’ll remove material slots from the low poly mesh as otherwise Unity will expect different textures for each slot (we bake all materials in to just one).
- Duplicate your work from the previous step in to a separate collection as a ‘backup’.
- Remove all material slots from the new model.
- Perform
Apply All Transformsvia Ctrl + A (this shouldn’t be necessary, but it’s here just in case - if some adjustment happened, even by accident along the way, it’s good to do this as otherwise it can show up in Unity with a wrong scale, rotation and so on). - Export the mesh to FBX using the
Unity exportpreset (basically only export selected and don’t pack anything).
9. Setup in Unity
With every deletion and reimport of textures in to Unity their settings will reset which can range in effect from unnoticeable to catastrophic like in the case of the normal map, remember to fix them each time (though this could depend on the import presets set in the project)!
- Import your mesh and all the texture files in to Unity.
- Make sure the normal map’s type is set to
Normal Map. - Set a proper import resolution and compression to
High Qualityas these have the highest impact on perceived quality in engine. - Create a new material (most will be based on
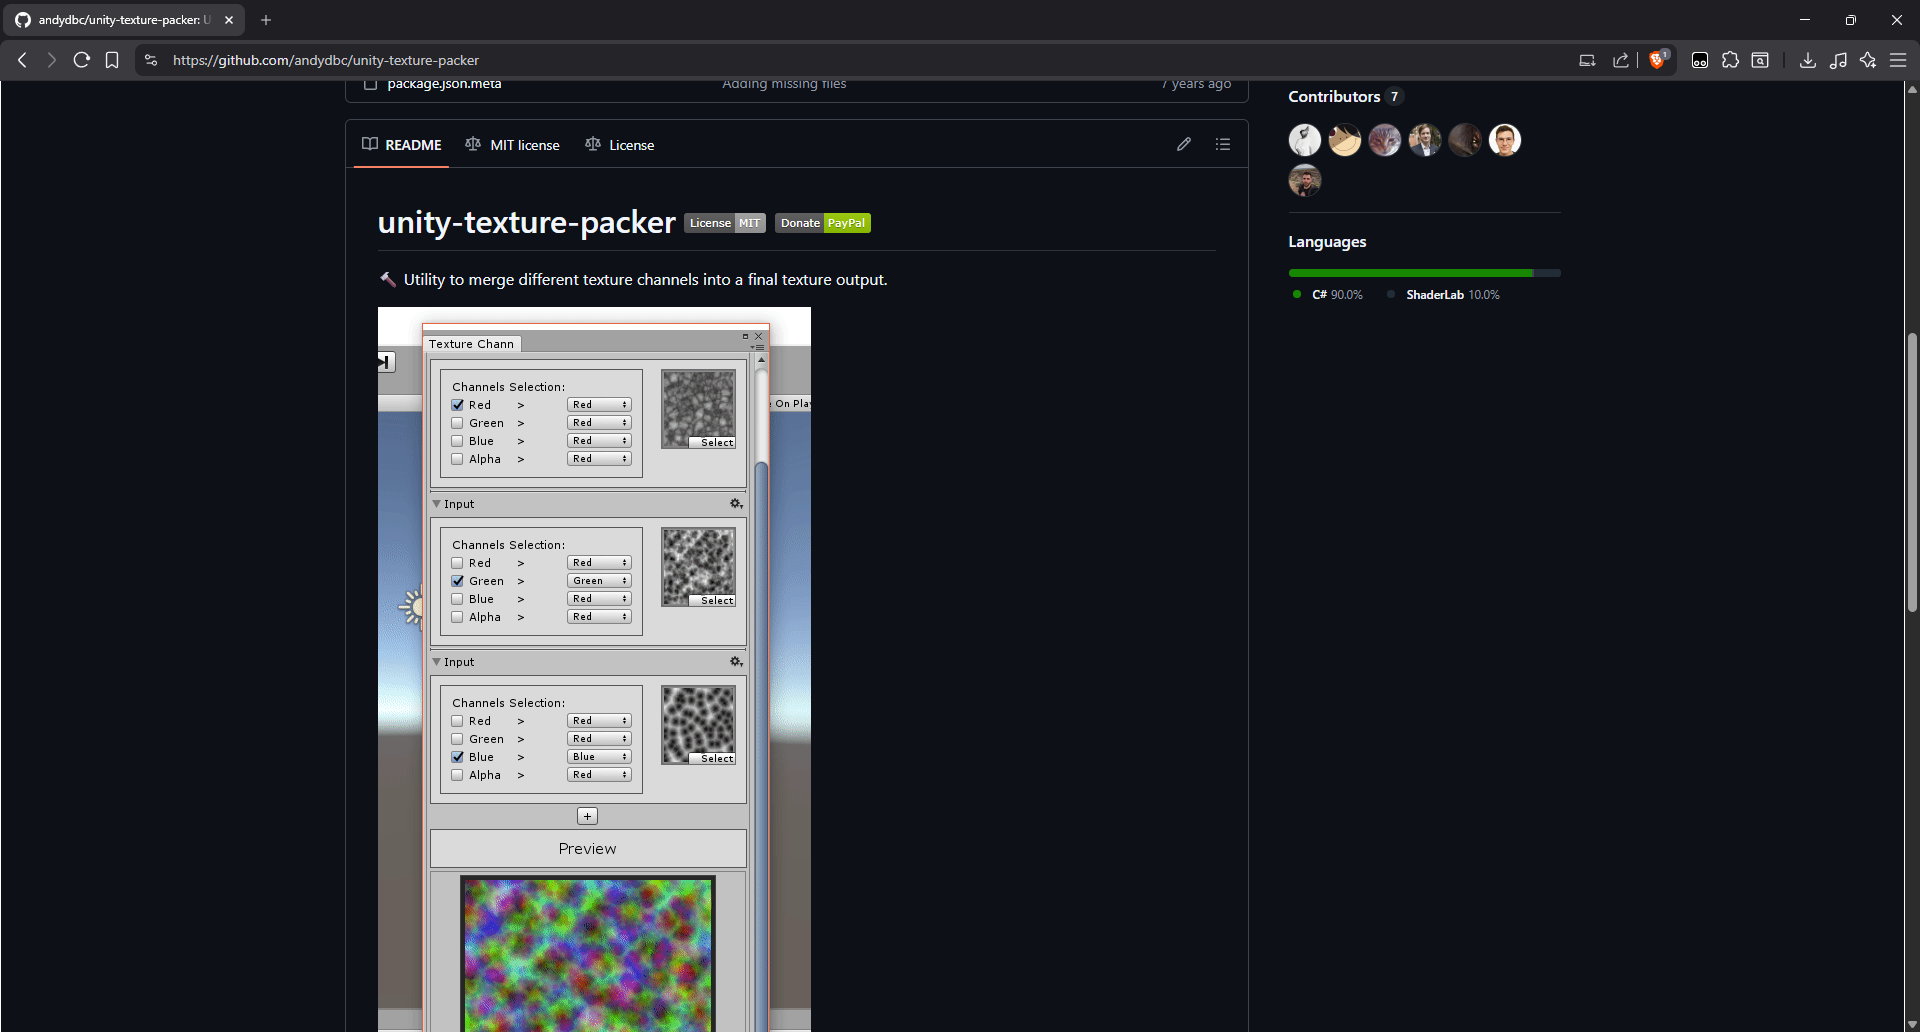
HDRP/Lit). - Open a channel packer tool (like this or this one), then add the textures, setup the parameters and generate the map mask texture (see guide in the image above).
- Assign the diffuse (albedo), normal and map mask textures to the material (if it isn’t, make sure Normal Map Space is set to
TangentSpace).
Potential Baking Issues
- Not having the proper mesh selected.
- Not having the right Bake Type selected.
- Not having the
Image Texturenode selected. - Having more than one material slot per mesh.
- Not having the right Render Engine selected (
Cycles). - Not having the right image open in the
UV Editorpanel. - Not having the nodes connected up to the output properly.
- Having
Selected to Activeenabled (if not baking normal map). - Not having
Selected to Activeenabled (if baking normal map). - Not having
Generatedset inImage Texturecausing an ‘Uninitialized image’ error. - Not having two meshes selected correctly when baking high poly details in to the normal map.
- Not having a proper
Selected to ActiveExtrusion value (this will cause artifacts on the normal map).
Afterthought
Although I hope that we end up 3D scanning (Blue laser and IR mode) some assets, most of them will be made using this approach as it achieves a nicer, more consistent, high quality look and just sells the effect better. Not to mention the whole process is a lot simpler and more repeatable.
New Milestones
It’s worth noting that the research I’ve been up to lately regarding Clay Doh and Unity’s Timeline editor, my attitude about where we are in development and how everything is panning out changed, for the better.
Something that’s been bugging me for a while is the fact that we didn’t really have a more detailed plan of action (just the generic milestones), that’s why I finally sat down and expanded on them a little bit:
- Rough prototype (1 week 05.03.2026)
- Lore object pickup
- Sequence (wife)
- Sequence (daughter)
- Rough level design (all rooms)
- Finalize design of sequences
- Crunch (8 weeks = 30.04.2026)
- Test & implement clay materials + wall smoothing?
- Pipeline (clay models and such)
- Make, scan, process, texture etc. final models
- Rigging & mocap (test stop motion effect)
- Player body anims
- Proper transitions between levels and such
- Interaction animations
- All cutscenes
- Add lore items
- Add music + SFX
- Add voice acting
- Finalization (3 weeks = 21.05.2026)
- Icons / logos
- Splash screens
- Post processing effects
- Optimization (occlusion, baking, light probes etc.)
- Dialing stuff in on test setup
- HDRP profiles
- Saving
- UI
- Pause menu
- Cutscene skipping*
- Menu (live + site URL and version and such)
- Credits
- Player settings
- Debug menu*
- Marketing (standee, trailer and such)
- QA tests
- Taking care of things at the university
What’s Next
Still, the most important thing on my side is implementing the lore item inspection, wife and daughter sequences, while on my bud’s side it’s fixes to the sequence layouts and start + end sequence block outs. With how things are going, there is no way we’ll be able to show a full rough prototype during this weekends lectures, however a lot of progress has been done regarding material tests, 3D asset creation experiments and the Blender to Unity pipeline.